draggan ai tool for portraits and head pose changes
draggan ai tool is especially useful for portraits because portrait edits often need small, believable changes. With draggan ai tool, you can guide a head pose shift by placing handle points on key areas like the jawline edge, cheek contour, eyebrow line, or hairline, then dragging slightly in the direction you want the pose to move.
A common use is changing a head tilt. If the face looks too straight or too stiff, draggan ai can help you tilt the head a little to make the portrait feel more natural. Place 2-4 handle points along one side of the jaw or hairline and move them subtly. draggan ai tool works best when the move is small and done in a few steps.
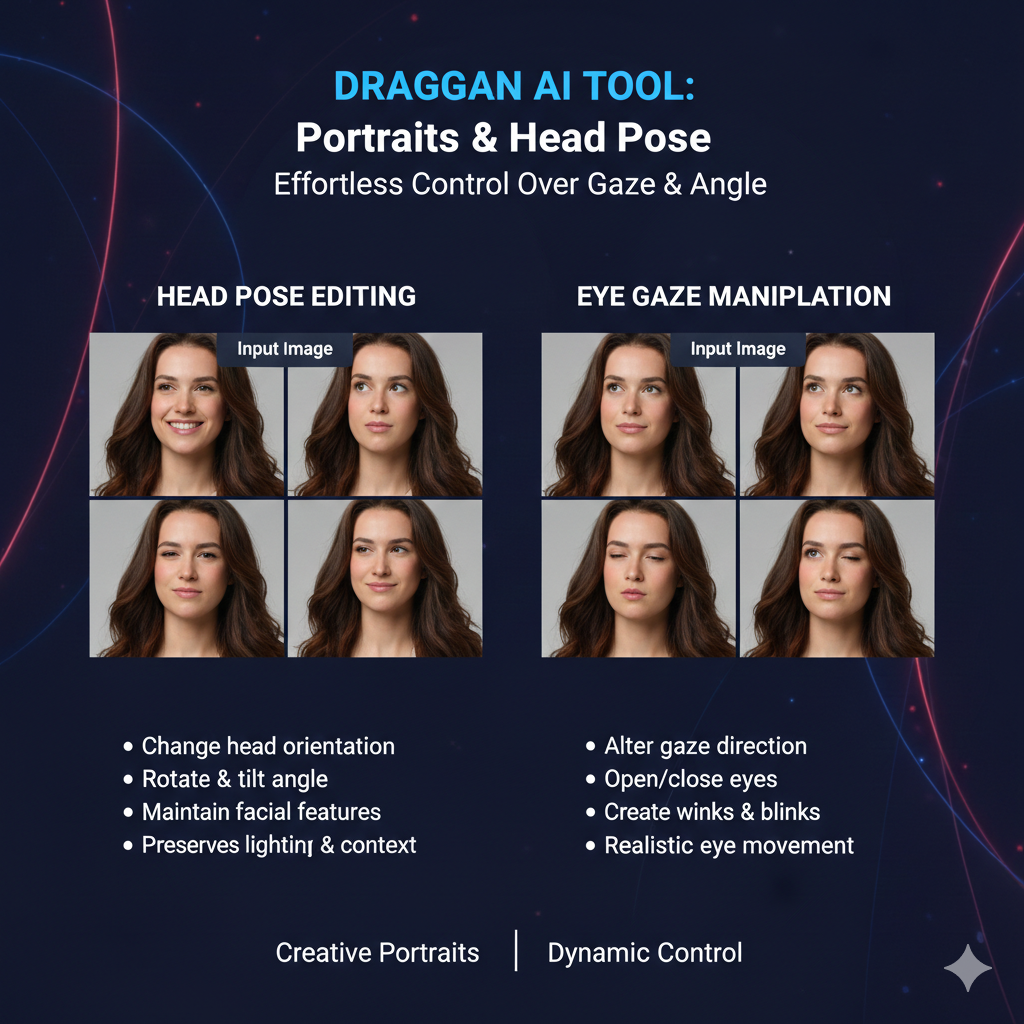
Another use is a mild head turn for a more dynamic look. For example, in thumbnails or profile photos, turning the face 5-10% toward the camera can make the image feel more engaging. With draggan ai, you can pull the cheek outline and jawline slightly, while using keep points on the nose bridge or one eye to prevent the whole face from drifting.
draggan ai tool also helps correct awkward angles. If the chin looks slightly off-center or the face feels unbalanced, you can reposition the chin area, smooth the cheek curve, or adjust the side hair volume so the head pose looks cleaner. This kind of correction is hard with basic warp tools, but draggan ai can keep textures and shading more consistent.
For the cleanest portrait results, use multiple handle points and add keep points on delicate areas like pupils, nostrils, and lip corners. This keeps the identity stable while you change the pose. When you guide it gently, draggan tool can give you a more flattering head pose without making the portrait look edited.
draggan ai tool for product images and creative variations
draggan ai tool works well for product images when you need small adjustments that make a big difference in how “premium” the product looks. Instead of reshooting, draggan ai helps you refine composition by nudging edges, corners, and key visual lines so the product feels more centered, balanced, and camera-ready.
A common use of draggan ai tool is correcting alignment issues. If a label looks slightly tilted, a box edge looks uneven, or a shoe angle feels off, you can place handle points along that edge and drag gently to straighten it. With small moves, draggan ai tool can keep textures like leather grain, fabric weave, or packaging print looking more natural than simple warp edits.
draggan tool is also useful for creating ad variations from one base image. You can move the product a little to create negative space for text, shift a handle, change the angle of a lid, or adjust the pose of a prop near the product. This makes draggan ai valuable for A/B testing creatives where you want multiple versions without changing the whole scene.
For lifestyle product shots, draggan ai can help reposition supporting elements. Example: move a flower slightly closer to the candle, adjust ribbon placement, or reshape a small decorative element so it frames the product better. When you use keep points on the background, draggan ai tool keeps the scene stable while the product area changes.
The best workflow is: make small edits, export a few versions, and compare performance. Use 2-6 handle points for clean shape control, and add keep points on shadows or table lines so they don’t shift. With this approach, draggan ai becomes a practical way to produce product image variations faster, without obvious “pixel warping.
draggan ai tool for designers, creators, and marketers
draggan ai is useful for designers because it saves time on small layout fixes that normally take a lot of manual masking and warping. When a subject is slightly off-position, draggan ai tool can nudge the pose, shift an object, or reshape an edge so the visual fits a banner, poster, or thumbnail layout without rebuilding the entire design.
For creators, draggan ai tool helps make content more clickable with subtle edits that keep the image natural. A small head turn, a slightly wider smile, more open eyes, or a better centered object can improve the “first impression” of a thumbnail. Because draggan tool is point-guided, creators can test multiple looks quickly and choose the most engaging version.

Marketers often need fast creative variations for A/B testing, and draggan ai tool supports that workflow. You can create extra negative space for copy by moving the subject left or right, adjust product angle to highlight a feature, or reposition props to frame the message better. Instead of producing totally new assets, draggan ai helps generate variations from the same base image.
draggan ai also reduces dependency on heavy editing skills for teams with limited design bandwidth. A marketing assistant or founder can make controlled edits that look professional, then hand off final polishing if needed. In this way, draggan ai tool acts like a speed layer before full production edits.
The best results for designers, creators, and marketers come from using draggan ai for realistic, physically possible changes and keeping movements small. Use multiple handle points for clean shape control, add keep points to stabilize background or branding elements, and export several versions. That’s how draggan ai tool becomes a practical content production tool, not just a demo effect.
draggan ai tool: Full Guide to Features, Editing Workflow, and Use Cases
draggan ai tool: Step-by-Step Beginner Tutorial
draggan ai tool starts with choosing where you will run it. Most beginners use a browser demo or a hosted interface first, because it’s faster to test. If you plan to run locally later, you can still learn the workflow on a demo. The key is to understand the editing process of draggan ai before worrying about setup.
Next, in draggan ai tool, load a clear image where the subject has strong edges and simple structure (portrait, product, animal face, clean object). After loading, generate or initialize the editable version inside draggan ai(some setups call this “generate,” “invert,” or “prepare”). This step matters because draggan ai needs an internal editable representation to start moving points.
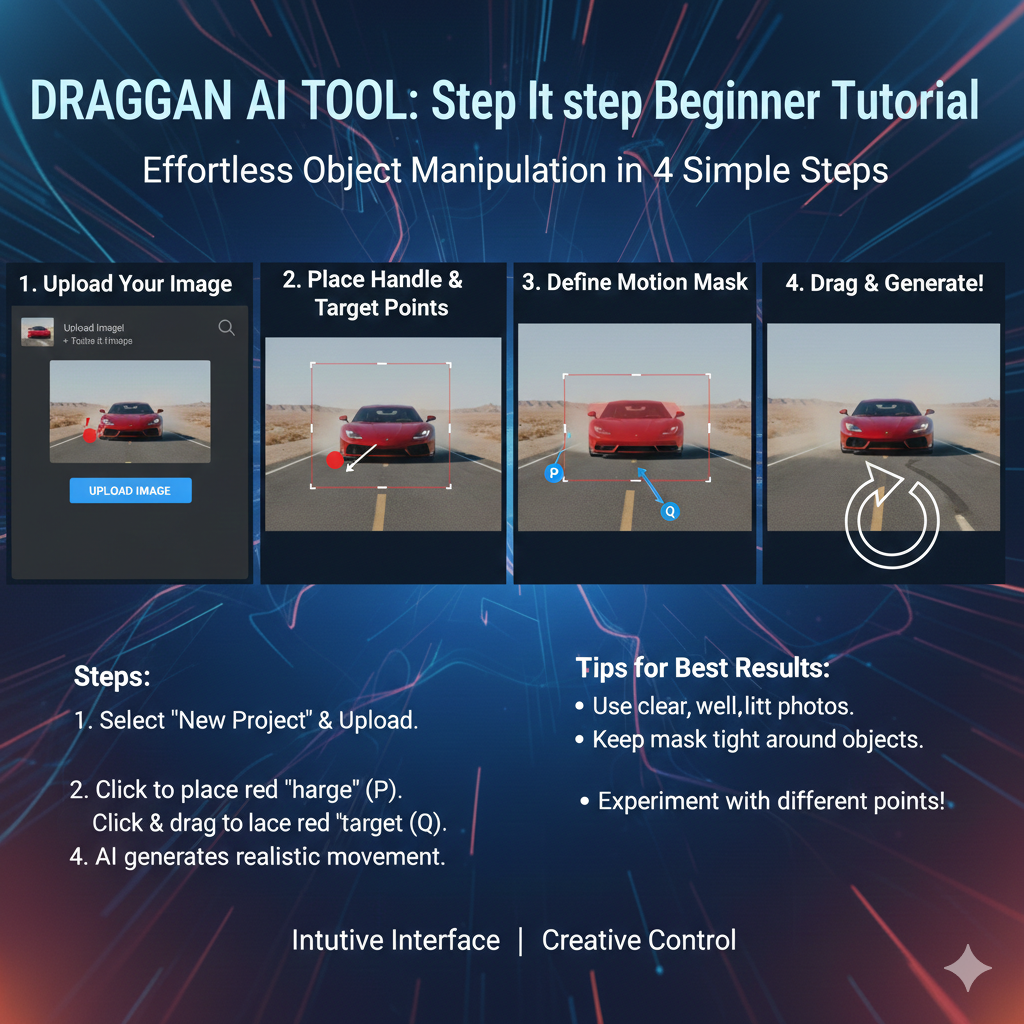
Now place your handle points in draggan ai tool on the exact part you want to move, like the corner of a mouth, eyebrow edge, jawline, product corner, or label border. Use more than one point for cleaner control. Then drag in small steps toward your target direction. draggan ai tool updates the image as you drag, so you can stop anytime and adjust.
To keep other areas stable, add keep points (if your version of draggan ai supports them). Place keep points on areas you don’t want to shift, like eyes, nose bridge, background lines, or shadow edges. This helps draggan ai focus the movement only where you want it, and it reduces strange distortions around the edit area.
Finally, refine and export. In draggan ai tool, do 2-3 small drags instead of one big drag, reset and retry if artifacts appear, then export the best version. If you’re using the result for content or ads, compare 2-4 variations side-by-side. This “quick iteration” habit is how draggan ai becomes genuinely useful for beginners.
draggan ai tool setup – choose demo or local install
If you’re new, start with a draggan ai tool demo first because a demo lets you learn the point-and-drag workflow in minutes without dealing with setup errors.
Use a draggan ai demo when your goal is quick testing – like understanding handle points, keep points, and how small drags change results.
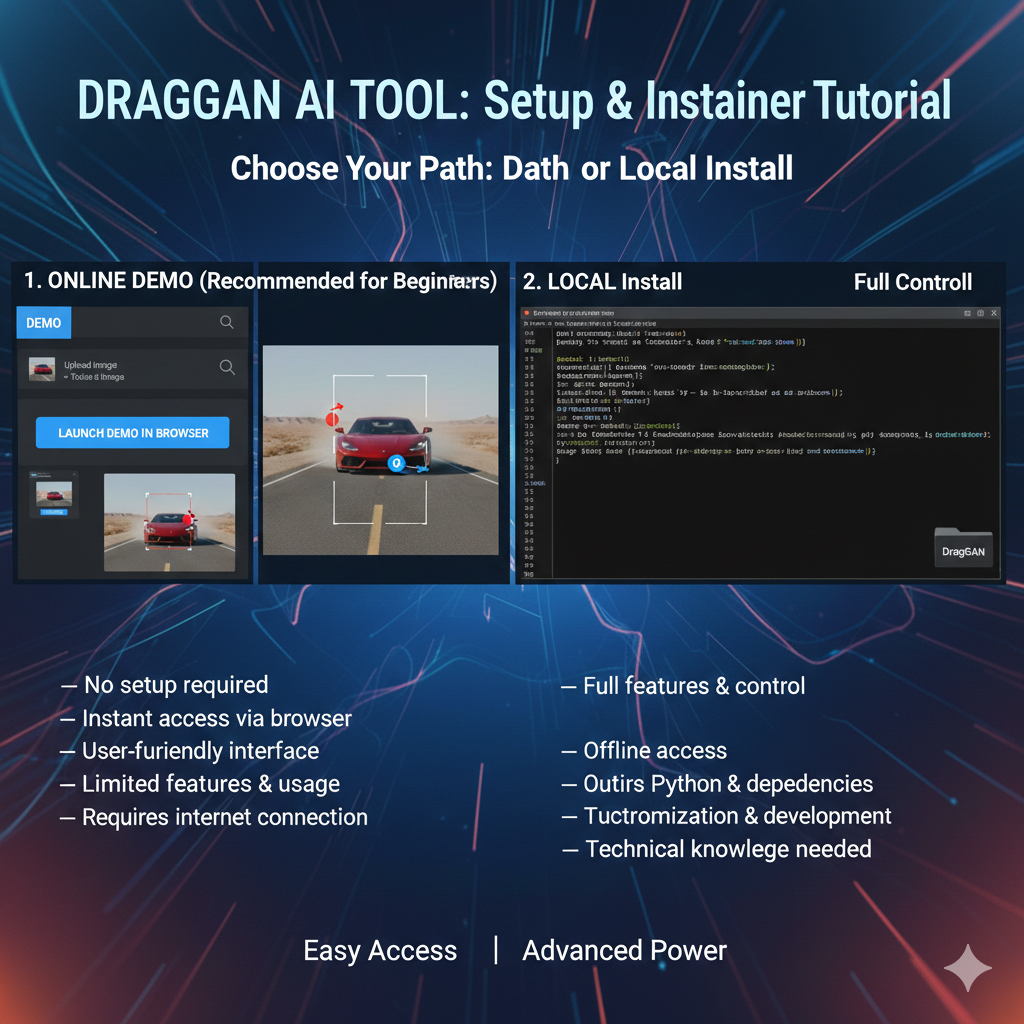
Choose a local install of draggan ai tool if you want more control, better speed, and privacy for your images, because local draggan ai runs on your own system.
Local draggan ai tool usually needs a stronger PC (often with a capable GPU), while a demo version of draggan ai tool can run in a browser but may be slower or limited.
Best beginner path: test 10-20 edits in a draggan ai demo, then move to local draggan tool only after you know the exact use cases you’ll publish in your blog.
draggan ai tool upload/select image and generate base
In draggan ai tool, start by uploading or selecting a clear, high-quality image where the subject has strong edges and visible structure. draggan ai tool performs best on portraits, product photos, and simple objects because draggan ai tool can understand shapes more easily.
After you upload, most versions of draggan tool require you to “generate” the editable base before dragging points. This step creates the starting state that draggan ai tool will manipulate. Without generating the base, draggan ai can’t reliably move features in a realistic way.
draggan ai tool: How It Works, Key Features, and Real-World Use Cases
If your draggan ai tool interface gives multiple presets or models, pick the one closest to your image type. Using the right preset helps draggan ai produce cleaner textures and fewer artifacts, because draggan ai tool is trying to match the style and structure it expects.
Once the base is generated, zoom in and inspect details like eyes, lips, hair edges, product corners, or label lines. This quick check helps you decide where to place points later, and it also tells you if draggan ai created a stable base image or if you should regenerate inside draggan ai tool for a cleaner start.
Pro tip: don’t start dragging immediately. First, set your plan for the edit – what should move and what should stay fixed. When you generate a good base and plan your points, draggan ai becomes easier to control, and the final draggan ai tool result looks more realistic.
draggan ai tool place points and drag for controlled edits
In draggan ai tool, start by zooming into the exact area you want to change, then place 2-6 handle points on the feature you want to move. draggan tool responds better when points are placed along the natural edge of a shape, like a jawline curve, eyebrow line, product corner, or object outline, because draggan ai can “read” the structure.
After placing handle points in draggan tool, drag in small steps toward your target direction. Think of it as nudging, not pulling. Small movements help draggan ai tool keep the image realistic and reduce artifacts, while big movements can force draggan ai into strange distortions.
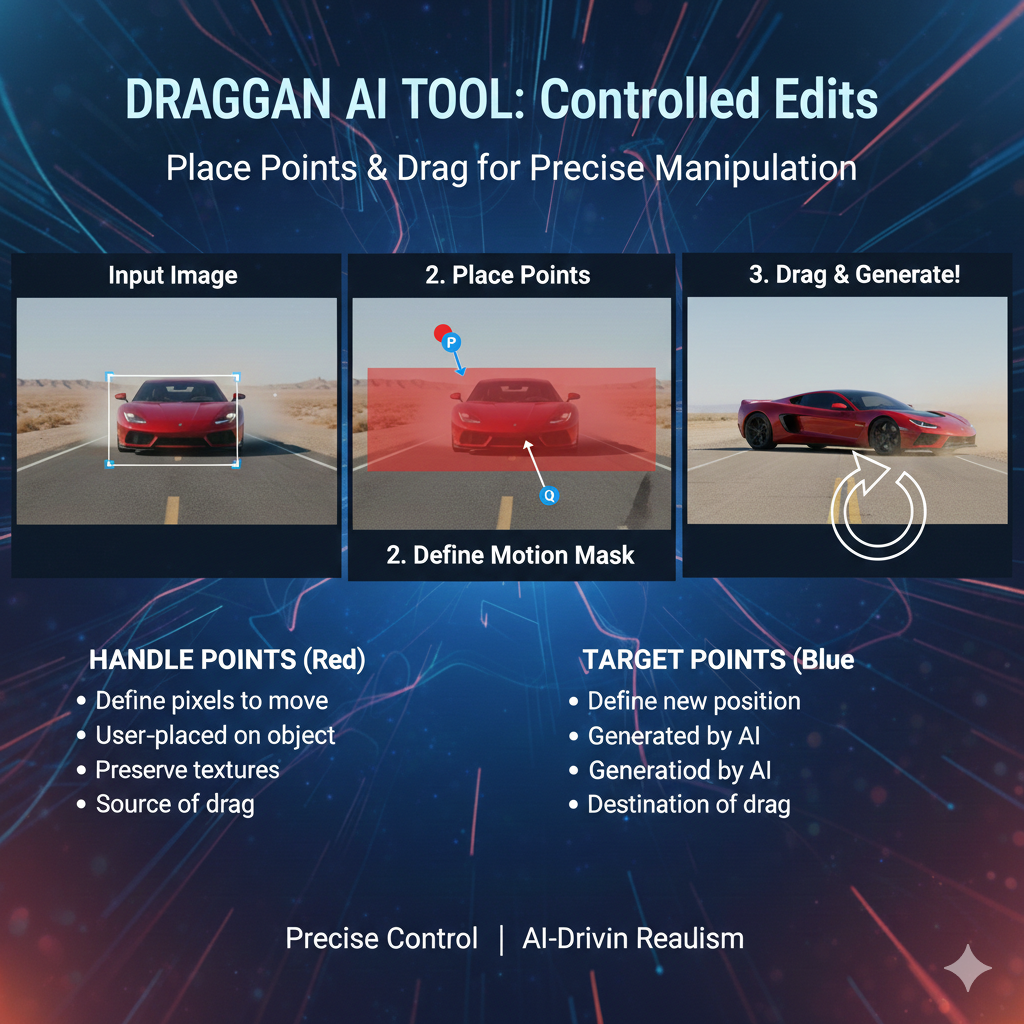
Use multiple points to keep the edit balanced. For example, to lift a smile, place handle points on both lip corners and one in the middle. To straighten a box edge, place handle points across the top edge. This spreads the movement, and draggan tool produces cleaner shape changes because draggan ai understands the intended transformation.
If your version supports keep points, add them before dragging. Place keep points on areas you don’t want to shift, like pupils, nose bridge, background lines, table edges, shadows, or brand logos. Keep points act like anchors so draggan ai tool focuses the change only where you want it, and draggan ai avoids moving the entire scene.
Refine by iterating: drag a little, stop, check realism, adjust point positions, and drag again. This loop is the fastest way to master draggan ai tool. When you treat draggan ai like controlled micro-edits instead of one big move, your draggan tool results look more natural and professional.
draggan ai tool export results and keep quality high
After your edits, draggan ai tool export should be done only when the image looks stable at 100% zoom. Before exporting from draggan ai tool, zoom in on edges like hair strands, jawlines, product corners, and text areas, because these spots reveal artifacts first in draggan ai results.
To keep quality high, prefer small edits and multiple iterations inside draggan ai tool instead of one large drag. Large drags can introduce blur, stretching, or odd textures, while smaller steps help draggan tool maintain sharpness and realism in the final export.
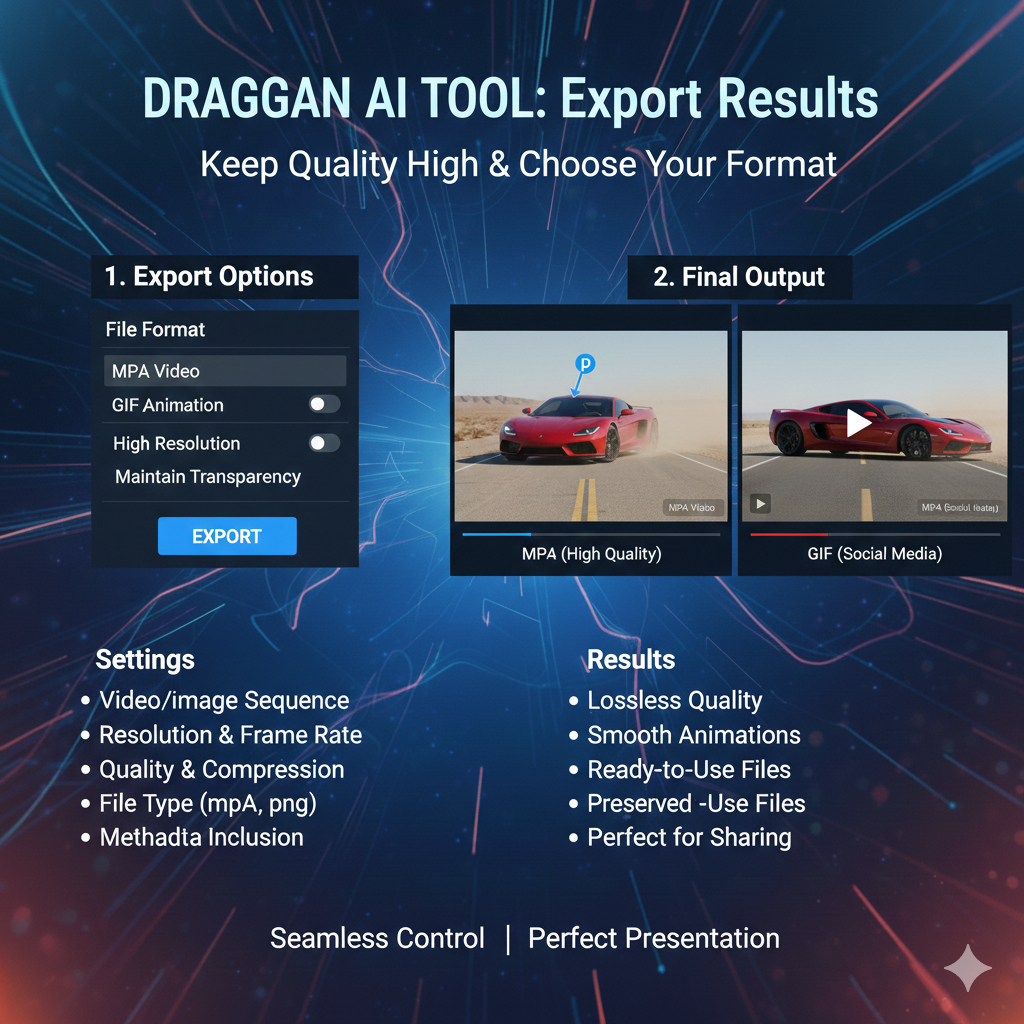
If your draggan ai tool interface offers resolution or quality settings, choose the highest available export option. A higher-quality export from draggan ai tool preserves fine details like skin texture and product material patterns, which matters for thumbnails, ads, and e-commerce images.
Post-export, do a quick cleanup check. Sometimes draggan ai tool outputs minor edge noise or texture inconsistency. If you notice it, redo the edit with keep points or reduce the drag distance in draggan ai tool, then export again from draggan ai for a cleaner final.
Save versions. Export 2-4 variations from draggan ai (example: slight smile, medium smile, head tilt A, head tilt B). Versioning keeps quality high because you can compare results side-by-side and pick the most natural-looking draggan tool output for your blog or content.
draggan ai tool: Requirements and Setup (PC, GPU, Cloud Options)
draggan ai tool can be used in three main ways: browser demo, cloud notebook, or local install. If your goal is learning fast, a draggan ai demo is the easiest starting point because you don’t need to configure anything before testing edits.
For local use, draggan ai tool generally benefits from a GPU because image generation and interactive updates can be heavy. You can try draggan tool on CPU in some setups, but it may feel slow and less practical for repeated edits, especially on high-resolution images.

A good PC setup for draggan ai tool is one with a modern multi-core CPU, enough RAM to handle large images smoothly, and a dedicated GPU if you want faster iterations. The main point: draggan tool performance depends on how quickly your machine can update the image while you drag points.
If you don’t have a strong PC, cloud options are a simple workaround. Many people run draggan ai tool through cloud notebooks or hosted interfaces where the compute happens online. This lets you use draggan ai from a normal laptop, but speed and limits can vary depending on the service.
Best beginner setup path for draggan ai: start on a demo to learn handle points + keep points, move to cloud if you need more power, and choose local install only when you want consistent speed and full control. This way, draggan ai tool stays easy in the beginning and scalable later.
draggan ai tool system requirements (what you need to run locally)
For local draggan ai tool, you can run on Windows/macOS/Linux. Some implementations also support CPU and Apple Silicon, but draggan ai tool will be much slower without a GPU.
GPU VRAM is the main requirement for draggan ai: plan 6 GB VRAM for 512px models and 8 GB VRAM for 1024px models when running draggan ai locally.
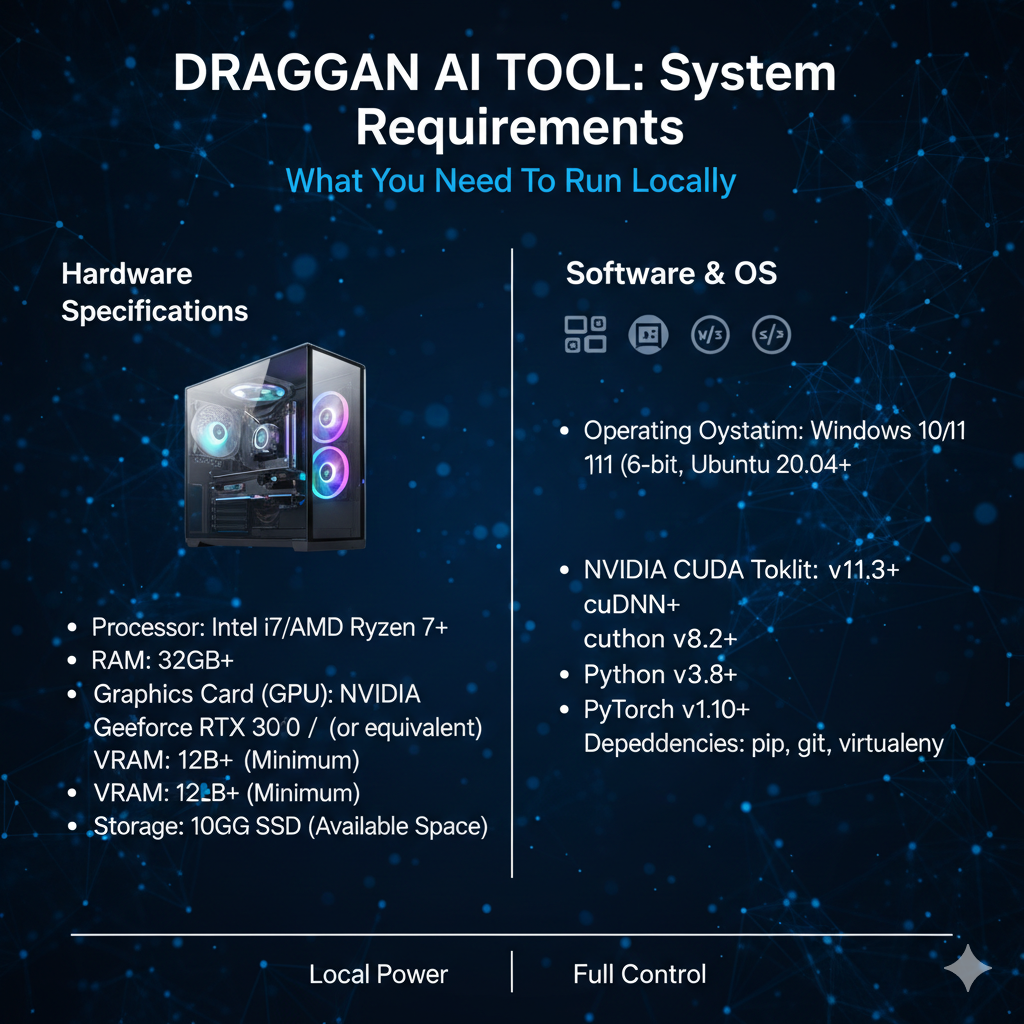
Software basics for draggan ai tool typically include Python (often installed via Conda) plus PyTorch, and if you use an NVIDIA GPU you’ll need a CUDA-compatible setup so draggan ai can use the GPU properly.
A practical minimum for smooth draggan ai tool use is: modern multi-core CPU, 16 GB RAM (more helps for large images), and enough disk space for models and dependencies because draggan ai projects download weights and packages during setup.
If your PC is weak, draggan ai tool is still usable by switching to cloud notebooks or hosted demos, but for consistent speed and full control, a local GPU setup is the most reliable way to run draggan ai for repeated edits.
draggan ai tool demo options (Colab/Gradio style setups)
The easiest way to try draggan ai tool is a Google Colab demo, where you run draggan ai tool in the browser and usually get a Gradio interface. Many Colab notebooks for draggan ai tool launch Gradio directly so you can upload an image, place points, and test edits without local installation.
A Gradio demo is basically a simple web app UI for draggan ai tool. In Gradio, draggan tool becomes interactive – you can add handle points, add keep points (if supported), drag, preview, and export. Some community repos explicitly provide a “run the Gradio demo” command or script for draggan ai.
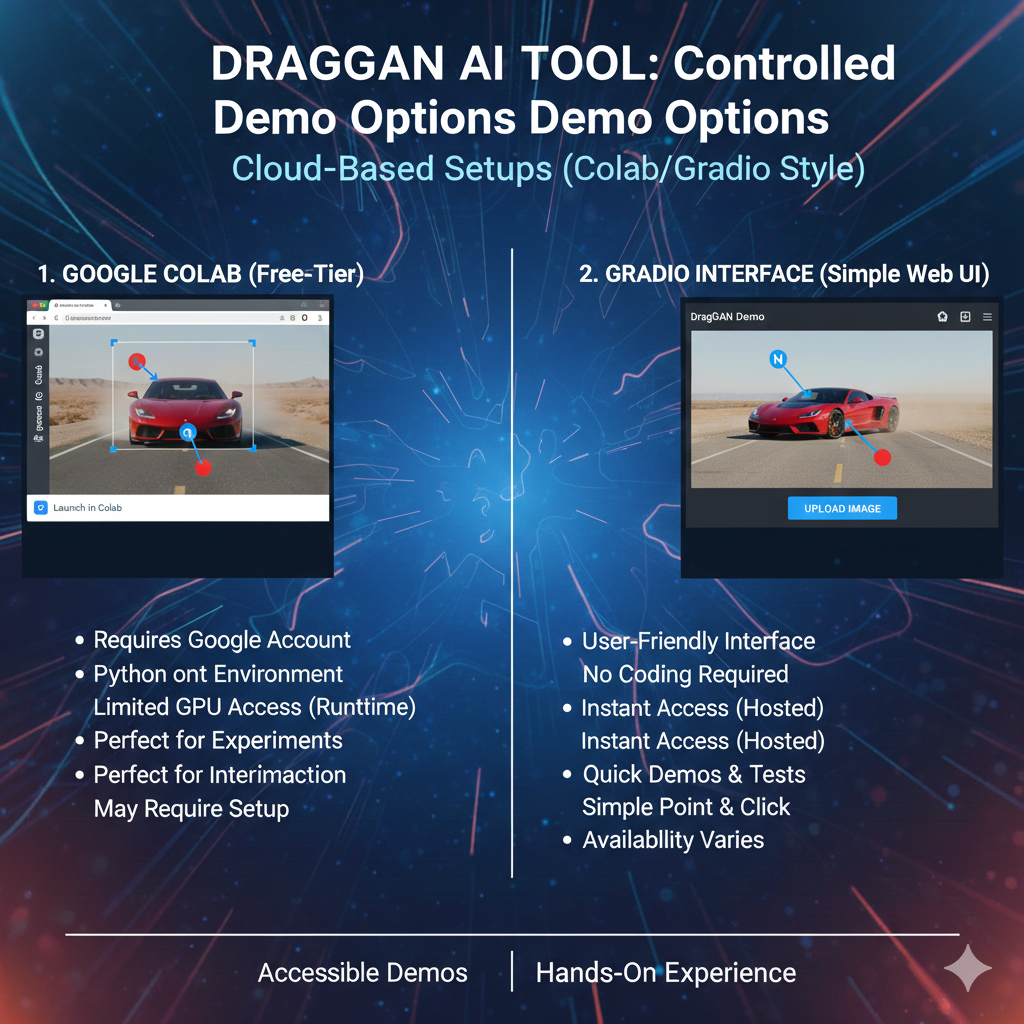
Another popular option is Hugging Face Spaces, where draggan ai demos are hosted publicly as Gradio apps. This means you can open a Space in your browser, test draggan tool quickly, and share the demo link.
If you want “demo convenience” but still need more power than your laptop, a common workflow is: run draggan ai on Colab (GPU runtime) and access it through Gradio. Colab notes often remind you to switch runtime to GPU for smoother draggan tool interaction.
For your blog, mention a simple demo ladder: start with a hosted Gradio Space for quick testing, move to a Colab Gradio demo when you need GPU speed, and only then consider local setup for consistent daily use. This keeps draggan ai beginner-friendly while still giving readers options.
draggan ai tool: Tips to Get Better Results Faster
The fastest way to improve draggan ai results is to start with the right images. draggan ai tool works best on clear photos where the subject has strong edges and predictable structure – clean portraits, simple product shots, and objects with visible outlines. If the image is noisy, low-res, or messy, draggan tool may struggle and the edit can look unrealistic.
Use smaller moves, not bigger moves. In draggan ai, large drags often create stretching, blur, or odd textures. Instead, do 3-6 small drags, checking after each step. This “micro-edit” style helps draggan ai tool keep realism and gives you more control over the final shape.
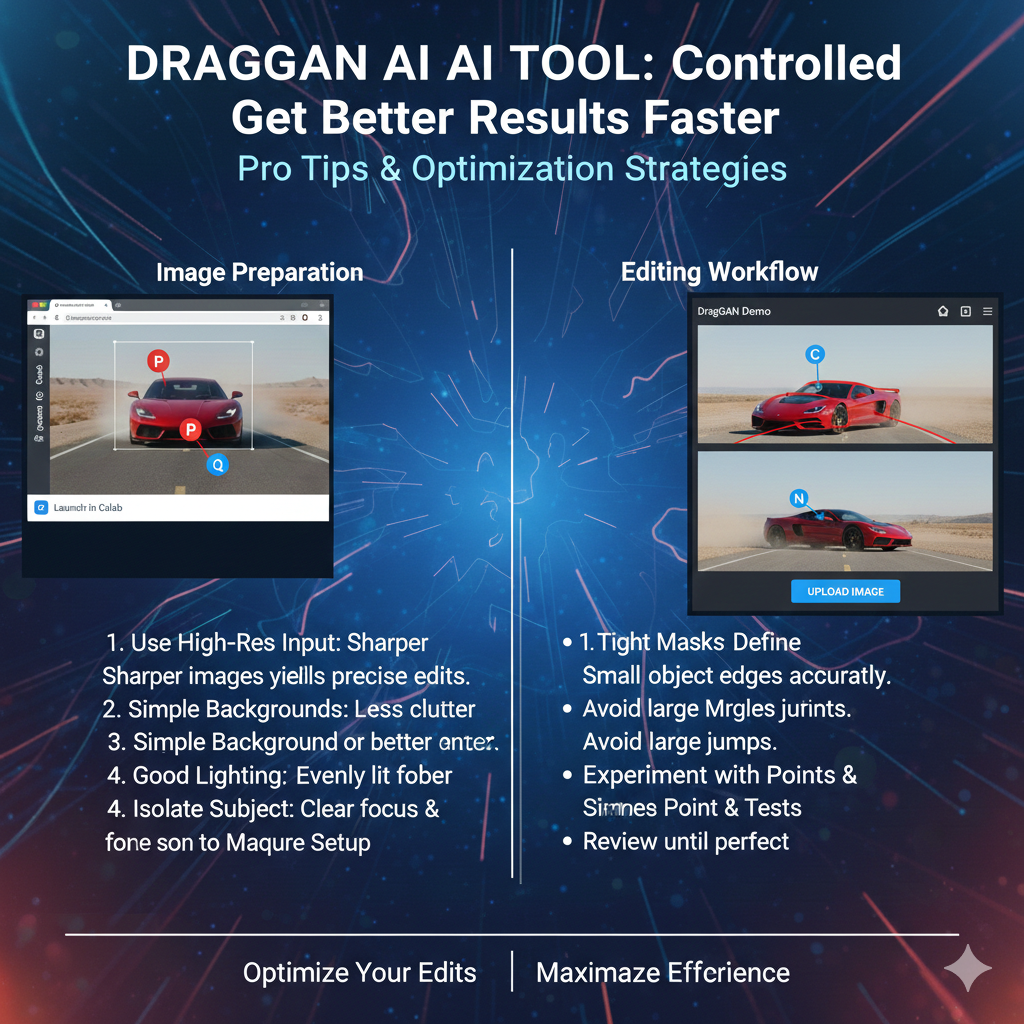
Place more points for important edits. A common beginner mistake is using only one handle point. For cleaner results, use 2-6 handle points along the feature you’re changing, and distribute them evenly. When you guide the shape with multiple points, draggan ai tool understands the intended transformation better and produces smoother edits.
Anchor the scene with keep points whenever possible. Keep points tell draggan ai tool what should not move, like eyes, nose bridge, background lines, table edges, or shadows. When you add keep points, draggan ai becomes more precise because the movement stays focused instead of shifting the whole image.
Iterate like a pro: drag a little, pause, zoom in, and refine. If you see artifacts, undo and reduce the drag distance, or reposition points closer to the real edge of the subject. The more you treat draggan tool like controlled shaping rather than one-shot editing, the faster your draggan ai tool results become clean and consistent.
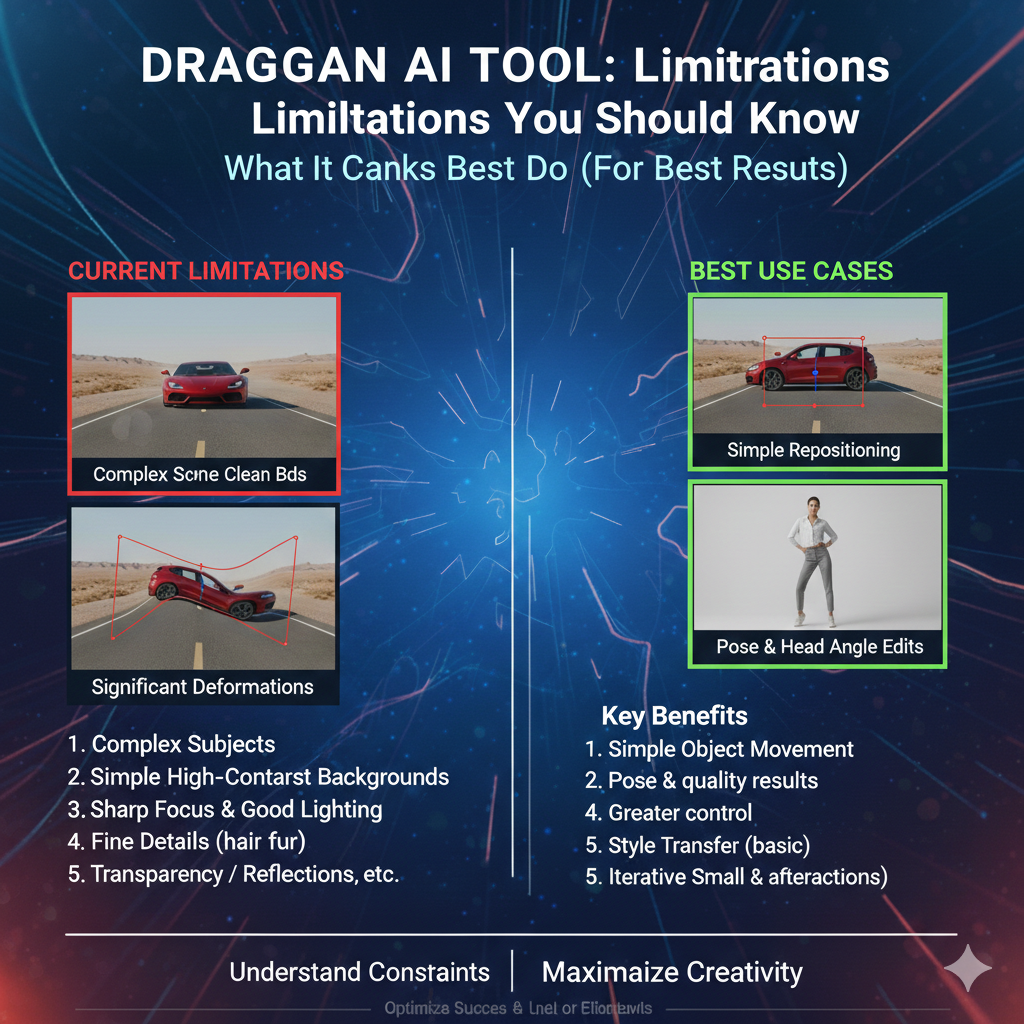
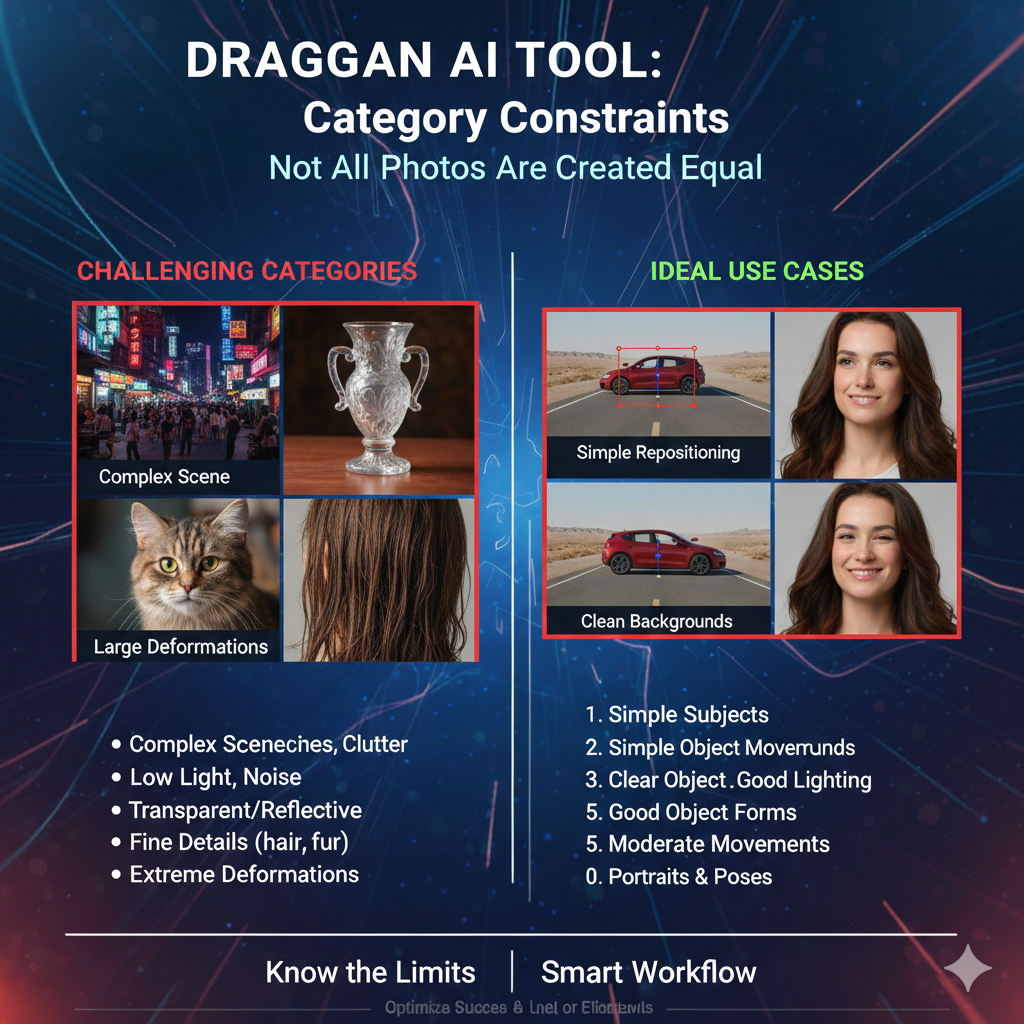
draggan ai tool best images to start with (what works best)
draggan ai tool works best on sharp, high-resolution images where the main subject is clearly separated from the background – clean portraits, single products, and simple objects are perfect for draggan.
Choose images with strong edges and visible structure (jawline, eyebrows, product corners, rims, handles), because draggan ai tool follows shape boundaries and gives cleaner results when the structure is obvious to draggan ai.
Use photos with even lighting and low noise. Harsh shadows, heavy blur, or grain can confuse textures, so draggan ai tool may create artifacts; clean lighting helps draggan ai keep realism.
Start with “front or 3/4 angle” subjects instead of extreme angles. Moderate poses are easier for draggan ai to adjust naturally, so draggan ai tool edits like slight head turns or small product angle changes look more believable.
Avoid crowded scenes in the beginning. If the image has multiple faces, busy hair, complex patterns, or cluttered backgrounds, draggan ai tool can move unwanted areas; simple compositions help draggan ai tool stay controlled and consistent.
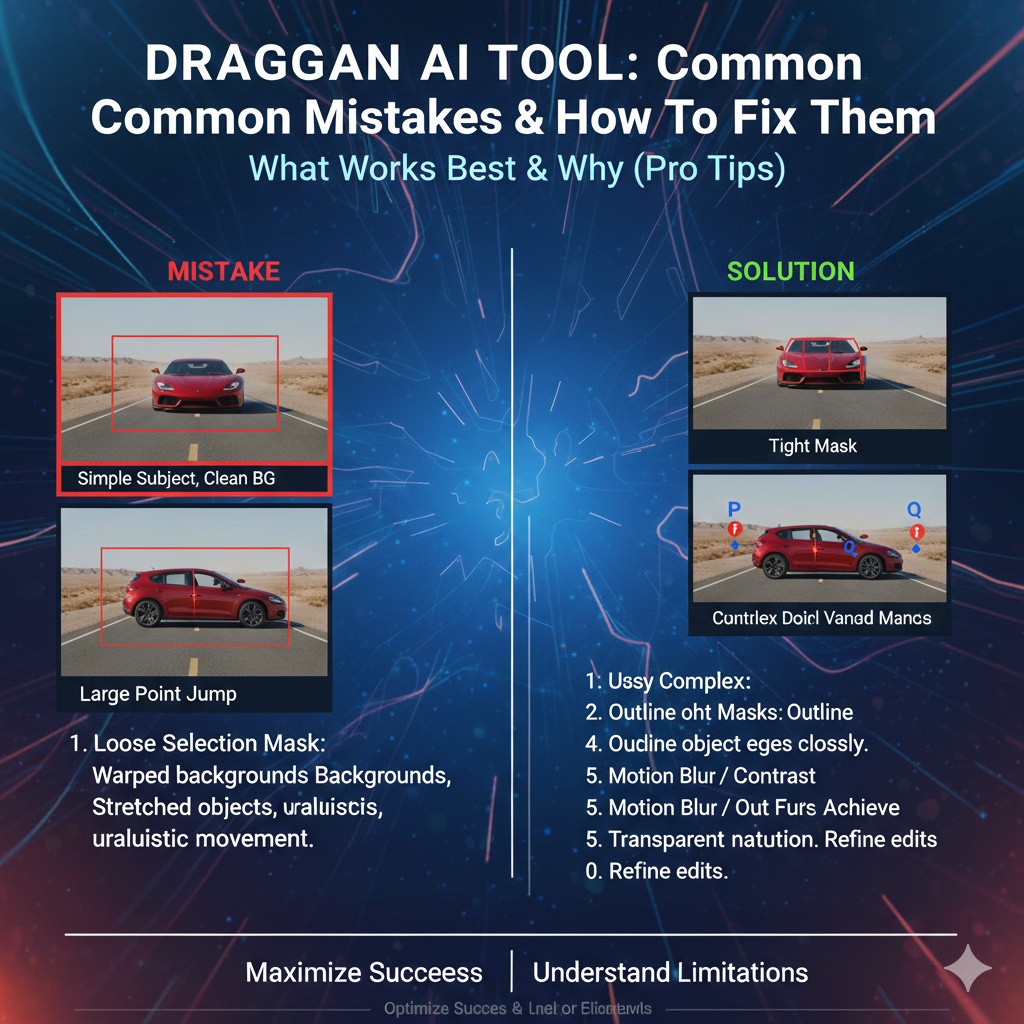
draggan ai tool common mistakes and how to fix them
Mistake: dragging too far in one move
Fix: In draggan ai tool, do 3-6 smaller drags instead of one big drag. Smaller steps help draggan ai tool keep textures and proportions realistic, and you can stop early if draggan tool starts creating artifacts.
Mistake: using only one handle point
Fix: Use 2-6 handle points in draggan ai along the same feature (lip line, eyebrow, jaw edge, product corner). Multiple points make draggan tool understand the intended shape change and reduce weird stretching in draggan tool results.
Mistake: placing points in the wrong spot
Fix: Place handle points on clear edges and stable structure. If points are inside blurry areas, ai tool may move the texture incorrectly. Zoom in, place points on real boundaries, and re-place points if draggan ai moves the wrong region.
Mistake: background shifts or the whole face/object moves
Fix: Add keep points (anchors) in draggan ai tool on areas that must stay fixed – eyes, nose bridge, ear line, table edges, shadows, background lines. Keep points tell draggan tool what not to move and make draggan ai edits cleaner.
draggan ai tool: What It Is and Why It’s Trending
Mistake: strange texture artifacts (skin, hair, patterns)
Fix: Reduce the drag distance, try a different set of points, and avoid editing highly detailed textures directly. For hair and complex patterns, guide movement using edge points, not inside the texture. This keeps draggan tool more stable and improves draggan ai tool realism.
draggan ai tool editing workflow – small moves, multiple iterations
The best draggan ai tool workflow is to plan a small change first. Decide exactly what you want to move (jawline, eyebrow, lip corner, product edge) and what must stay fixed. When you start with a clear goal, draggan ai tool becomes easier to control and your draggan ai tool result looks more natural.
In draggan ai tool, place handle points along the edge of the feature you want to move, then drag only a little. A small move is usually enough to see improvement. If you need more change, repeat with another small drag. This “small move” method helps draggan ai preserve texture and reduces artifacts in draggan ai edits.
After each drag, pause and inspect. Zoom in on the area you edited and nearby edges. If you see stretching or blur, undo or reduce the drag distance. This check-after-each-step habit is the fastest way to get consistent draggan ai tool results without wasting time.
Use keep points as anchors while iterating. Add keep points on eyes, nose bridge, background lines, shadows, or logo areas so the rest of the image stays stable. When the scene is anchored, draggan ai tool iterations stay focused and draggan ai edits look cleaner.
Finish by saving versions. Export 2-4 variations from draggan ai tool with slightly different movements, then compare them side-by-side. Multiple iterations and versioning is how draggan tool becomes a real workflow tool – you don’t chase the “perfect” edit once, you let draggan ai produce a few strong options and pick the best.
want to learn more ai tools click here